Cloudreve
Cloudreve allows you to quickly build both public and private cloud storage systems, with underlying support for different cloud storage platforms, so you don’t have to worry about physical storage when you’re actually using it. You can use Cloudreve to build a personal disk, a file sharing system, or a public cloud system for small or large groups.
Official Website:https://cloudreve.org/
Github:https://github.com/cloudreve/Cloudreve
Install Document:https://docs.cloudreve.org/getting-started/install
Demo: https://cloud.nicejf.cn/
Installation Startup
It is recommended that Cloudreve be stored in the website directory for ease of management.
mkdir /www/wwwroot/cloudrevecd /www/wwwroot/cloudrevewget https://github.com/cloudreve/Cloudreve/releases/download/Of course, you can also upload the zip to the cloudreve directory.
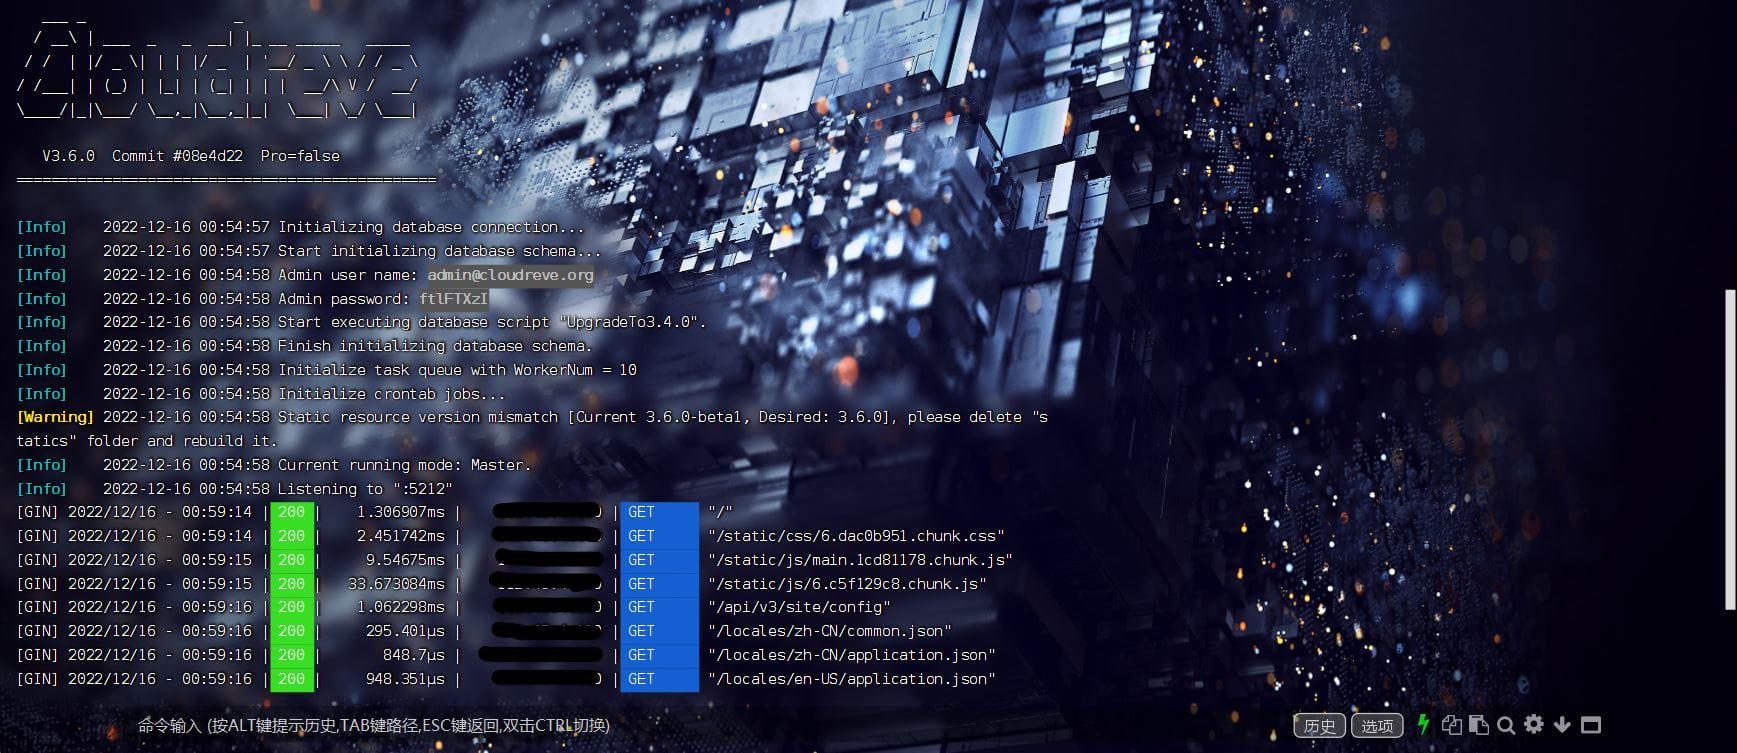
tar -zxvf cloudreve_3.0.0_linux_amd64.tar.gzchmod +x ./cloudreve./cloudreveThe initial account password for cloudreve will be displayed.

Add a process daemon to make sure the service is running properly.
process guard
Systemd
vim /usr/lib/systemd/system/cloudreve.serviceAdd the following configuration, changing PATH\_TO\_CLOUDREVE at 2 to the installation directory.
[Unit]
Description=Cloudreve
Documentation=https://docs.cloudreve.org
After=network.target
After=mysqld.service
Wants=network.target

[Service]
WorkingDirectory=/PATH_TO_CLOUDREVE
ExecStart=/PATH_TO_CLOUDREVE/cloudreve
Restart=on-abnormal
RestartSec=5s
KillMode=mixed

StandardOutput=null
StandardError=syslog

[Install]
WantedBy=multi-user.target
The following is my config.
[Unit]
Description=Cloudreve
Documentation=https://docs.cloudreve.org
After=network.target
After=mysqld.service
Wants=network.target

[Service]
WorkingDirectory=/www/wwwroot/wp.shacx.fun
ExecStart=/www/wwwroot/wp.shacx.fun/cloudreve
Restart=on-abnormal
RestartSec=5s
KillMode=mixed

StandardOutput=null
StandardError=syslog

[Install]
WantedBy=multi-user.target
Then execute the following commands separately to update the configuration.
# Updating the configuration
systemctl daemon-reload

# Start Service
systemctl start cloudreve

# Setting up bootup
systemctl enable cloudreve
Managing cloudreve commands.
# Strat Service
systemctl start cloudreve

# Stop Service
systemctl stop cloudreve

# Restart Service
systemctl restart cloudreve

# Display Status
systemctl status cloudreve
Reverse Proxy
Cloudreve listens on port 5212 by default. Make sure to open the intranet port 5212, the extranet port can be left open.
Open the website’s reverse proxy settings, preferably configured https.
Just visit the website domain and log in with your previous account password!
Configuration File
This is used to modify the listening port and data storage method, if you don’t need it, don’t look at this step.
You can specify the configuration file address.
./cloudreve -c /path/to/conf.iniConf.ini file automatically generated in the directory.
[System]
; Mode of operation
Mode = master
; Listen port
Listen = :5212
; Whether to enable Debug
Debug = false
; Session key, usually generated automatically at first startup
SessionSecret = 23333
; Hash salt, usually generated automatically at first boot
HashIDSalt = something really hard to guss
; Header to be used when presenting client IPs
ProxyHeader = X-Forwarded-For

; SSL related
[SSL]
; SSL listening port
Listen = :443
; Certificate Path
CertPath = C:\Users\i\Documents\fullchain.pem
; Private key path
KeyPath = C:\Users\i\Documents\privkey.pem

; Enable Unix Socket Listening
[UnixSocket]
Listen = /run/cloudreve/cloudreve.sock
; Set permissions on the resulting socket file
Perm = 0666

; Database related, if you only want to use the built-in SQLite database, this section can be simply deleted
[Database] ; Database type, currently supports sqlite database.
; Database type, currently supports sqlite/mysql/mssql/postgres.
Type = mysql
; MySQL Port
Port = 3306
; User Name
User = root
; Password
Password = root
; Database address
Host = 127.0.0.1
; Database Name
Name = v3
; Table Prefix
TablePrefix = cd_
; Character set
Charset = utf8mb4
; SQLite Database File Path
DBFile = cloudreve.db
; Buffer time to safely close the database connection before the process exits.
GracePeriod = 30

; Configuration in Slave Mode
[Slave]
; Communication key
Secret = 1234567891234567123456789123456712345678912345671234567891234567
; Callback Request Timeout (s)
CallbackTimeout = 20
; Signature validity period
SignatureTTL = 60

; Cross-domain configuration
[CORS]
AllowOrigins = *
AllowMethods = OPTIONS,GET,POST
AllowHeaders = *
AllowCredentials = false
SameSite = Default
Secure = lse

; Redis-related
[Redis]
Server = 127.0.0.1:6379
Password =
DB = 0

; Slave Configuration Override
[OptionOverwrite]
; can be overridden directly using the `setting name = value` format
max_worker_num = 50
Using Mysql Database
By default, Cloudreve uses the built-in SQLite database and creates the database file cloudreve.db in the sibling directory. If you want to use MySQL, add the following to the configuration file and restart Cloudreve. note that Cloudreve only supports MySQL versions greater than or equal to 5.7.
After changing the database configuration, Cloudreve will re-initialize the database and the existing data will be lost.
[Database]
; Database type, currently supports sqlite/mysql/mssql/postgres.
Type = mysql
; MySQL Port
Port = 3306
; User name
User = root
; Password
Password = root
; Database address
Host = 127.0.0.1
; Database name
Name = v3
; TablePrefix
TablePrefix = cd
; Charset
Charset = utf8
Upgrade System
- Backup Database;
- Download or build the latest version of Cloudreve;
- Stop a running Cloudreve;
- Replace an old version of the Cloudreve main program with a new one;
- Start Cloudreve;
- Clear your browser cache;
- If you are using Cloudreve in slave mode, replace the Cloudreve on the slave node with the same version as well.
10 条评论
这是一篇佳作,无论是从内容、语言还是结构上,都堪称完美。
作者的情感表达细腻入微,让人在阅读中找到了心灵的慰藉。
代码示例规范,注释详细,便于复现。
技术前瞻性分析体现行业敏感度。
论点鲜明,论据链环环相扣,论证有力。
?学术类评语?
字里行间饱含人文关怀,温暖而有力。
修辞手法运用娴熟,比喻贴切,感染力强。
这篇文章如同一幅色彩斑斓的画卷,每一笔都充满了独特的创意。
Thanks for sharing.